You'll be stuck with the title you've entered, you can't edit it later on, which is definitely a drawback. If you have a tendency to clutch under pressure, you might want to write down your title.
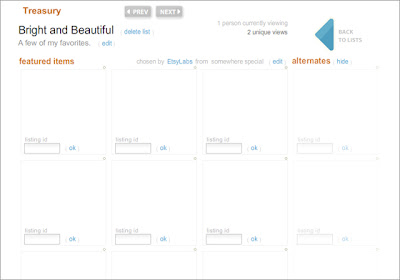
If you're successful in entering your title, you should be automatically taken to the window to enter in the id numbers for your Treasury. Here's what you'll see:
 The "listing id" is a number that every listing is assigned by Etsy, and it's unique to that item. You'll need 12 items, and if you choose to do so, 4 alternates. The alternates are the items in the far right vertical column, other people won't be able to see those items.
The "listing id" is found in the url for an item. For an example, let's find the listing id for my stacking ring set, "Pharoah's Favorites" . It has the following url:
http://www.etsy.com/view_listing.php?listing_id=33474546
The numbers after "listing_id=" are 33474546, and that is, not too surprisingly, the listing id number. You'll need to find them for each item you want for your Treasury, and then cut and paste them into the field for the listing id, and click on "ok". If all goes well, you'll see a thumbnail of the item appear in that section of the Treasury.
I like to think of a theme for my Treasuries, such as the shops of my Facebook Fans, hot color schemes, blue color schemes, etc. I'm sure you can come up with some wonderful Treasury ideas!
Just keep adding more items until you fill up your Treasury, and edit the two fields at the top with a little "edit" button next to them, if you feel so inclined. You can just leave them 'as is' is you wish, many people do. It's your Treasury, you're the boss, so have fun.
After you have all the items in your Treasury, you can move them around by just clicking and dragging. You can put things in the alternate row and move them out of it, too. It's fun to get things looking just right. Kind of like rearranging your furniture, without all the heavy lifting.
You can also get all ready to go before you get your Treasury, by saving the listing id numbers and Treasury title in a file, or email them to yourself, and then all you'll have to do is cut and paste them in when the happy moment arrives and you have your first Treasury!
It's a nice courtesy to send people a quick convo telling them you've put them in a Treasury, but not a requirement. It's also nice to send people who put you in a Treasury a little thank you convo, but again, that's strictly your decision. You might want to do a little P.R. for your beautiful new Treasury -- put the url up on your Facebook page, tweet about it, write it up in your blog, or utilize the "Promotions" section in the Forums.
I got the two pictures I used above from a very helpful guide on the Etsy Forums -- How to Make a Treasury (isn't that a great title, :-) which has a lot of excellent advice.
Hope you'll find this little guide of some help, and please feel free to add your own advice or ask any questions. I'd love to hear from you!
1 comment:
It's funny that I've been thinking of blogging about the same topic but I found it on your blog. Very helpful and detailed. :)
Post a Comment