Tuesday, December 8, 2009
Sterling Celtic Earrings
My latest design at Dalkullan Jewelry is inspired by Celtic symbols. I'm part Irish, and would love to visit the ancestral homeland someday -- some of my ancestors are from County Cork. But in the meantime, I have a lovely new pair of earrings to remind me of my heritage.
I made numerous drawings of the design before I settled on the one I finally crafted in sterling. I'd originally thought to put a cabochon in the center of each of the 3 silver swirls per earring, but that would have been too heavy. I toyed with the idea of using nephrite jade for the cabochons, but genuine jade is a darker green than I wanted for my design.
Aventurine is a lovely, spring green, with some darker inclusions. It reminds me of green connemara marble. It has such a wonderful contrast with the brightness of the sterling, I think they go very well together.
This is the first design I've crafted where the earwire is soldered to the earring -- it just flows from the main part of the earring. It's a graceful look; I like all the swirls and curves to the design.
If you would like to add Sterling Celtic Earrings to your jewelry wardrobe, I'd be happy to craft a pair just for you!
Monday, November 30, 2009
Universal Wish List
That sounds like wishing for the universe, but that's not what I'm getting at. It's a wish list you can use to gather together your coveted items from all over cyberland. At Amazon.com they've come up with a way.
Just go to Universal Wishlist and after a quick click and drag, you're gold! You just add their little icon to the menu bar of your web browser, and when you're on a page with something you're hoping Santa might put under your Christmas tree this year, just click on the icon. Voila! It's entered into your Amazon wishlist.
So you can just go to, say, hmm, let's see, oh yes! Dalkullan Jewelry , and when you've found that must have piece of jewelry, just click on your new icon, and it's in your Amazon wishlist. What could be more simple and more fun. :-)
Of course, getting friends and family to visit your wishlist and actualize your wishes is another matter....... Sorry, I don't know what to do about that one! But you have all your future purchases together at one handy location, isn't that neat?
Wishing you happy shopping!
Wednesday, November 25, 2009
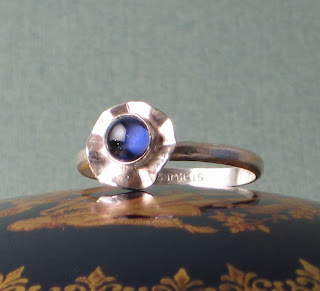
Iolite Flower Ring
Iolite is a beautiful gemstone. It's also known as dichroite, because of it's dichroic properties. Its color changes subtly depending on the direction that light shines through the stone.
Iolite isn't usually mined, but is found in gravel beds as a pebble worn smooth by water. On the Mohs hardness scale it's a 7 to 7.5, which makes it suitable for rings. Softer gemstones such as malachite aren't strong enough for the wear and tear of being worn in a ring, but as better used in earrings or necklaces.
I set the iolite cabochon in a bezel setting, which is nestled in a circle of sterling that I hand formed into a shape suggesting a flower. This is a beautiful ring, the violet blue of the iolite is prettily showcased by the gleaming sterling.
As with all my rings, I have completely hand fabricated the Iolite Flower Ring, and can make one for you in any size from 4 to 10, including half and quarter sizes. If you require a size outside this range, just convo me at Dalkullan Jewelry, and I'd be happy to discuss the matter with you!
Monday, November 16, 2009
My Star Trek Treasury
Guess I'm a bit of a geek. Star Trek has been one of my favorite shows, alright, it is my favorite tv show. The original series, with James T. Kirk, Mr. Spock, Bones, and the rest. Oh wait, "and the rest" is Gilligan's Island.
The Treasury is called "To Boldly Go". If you like Star Trek, go take a look. There's some really creative and fun things there!
Monday, November 9, 2009
How to Make an Etsy Treasury
Once the Treasury opens up, you need to be fast. I'd recommend you already have a title for your Treasury. A field will open up towards the bottom of the window, asking for the title of your Treasury. You have a limited window of opportunity to act -- he who hesitates is lost --- well, at least your chance of getting in this particular Treasury will be lost. If you suddenly find yourself in the uncomfortable position of forgetting the title you had in mind, just type in something generic like 'pretty stuff' or 'great finds' and then click on the "create" button.
You'll be stuck with the title you've entered, you can't edit it later on, which is definitely a drawback. If you have a tendency to clutch under pressure, you might want to write down your title.
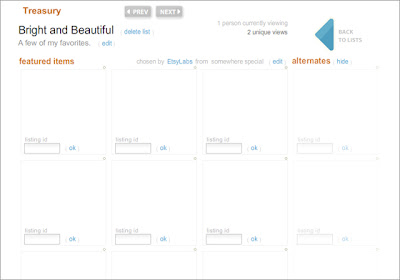
If you're successful in entering your title, you should be automatically taken to the window to enter in the id numbers for your Treasury. Here's what you'll see:
The "listing id" is a number that every listing is assigned by Etsy, and it's unique to that item. You'll need 12 items, and if you choose to do so, 4 alternates. The alternates are the items in the far right vertical column, other people won't be able to see those items.
The "listing id" is found in the url for an item. For an example, let's find the listing id for my stacking ring set, "Pharoah's Favorites" . It has the following url:
http://www.etsy.com/view_listing.php?listing_id=33474546
The numbers after "listing_id=" are 33474546, and that is, not too surprisingly, the listing id number. You'll need to find them for each item you want for your Treasury, and then cut and paste them into the field for the listing id, and click on "ok". If all goes well, you'll see a thumbnail of the item appear in that section of the Treasury.
I like to think of a theme for my Treasuries, such as the shops of my Facebook Fans, hot color schemes, blue color schemes, etc. I'm sure you can come up with some wonderful Treasury ideas!
Just keep adding more items until you fill up your Treasury, and edit the two fields at the top with a little "edit" button next to them, if you feel so inclined. You can just leave them 'as is' is you wish, many people do. It's your Treasury, you're the boss, so have fun.
After you have all the items in your Treasury, you can move them around by just clicking and dragging. You can put things in the alternate row and move them out of it, too. It's fun to get things looking just right. Kind of like rearranging your furniture, without all the heavy lifting.
You can also get all ready to go before you get your Treasury, by saving the listing id numbers and Treasury title in a file, or email them to yourself, and then all you'll have to do is cut and paste them in when the happy moment arrives and you have your first Treasury!
It's a nice courtesy to send people a quick convo telling them you've put them in a Treasury, but not a requirement. It's also nice to send people who put you in a Treasury a little thank you convo, but again, that's strictly your decision. You might want to do a little P.R. for your beautiful new Treasury -- put the url up on your Facebook page, tweet about it, write it up in your blog, or utilize the "Promotions" section in the Forums.
I got the two pictures I used above from a very helpful guide on the Etsy Forums -- How to Make a Treasury (isn't that a great title, :-) which has a lot of excellent advice.
Hope you'll find this little guide of some help, and please feel free to add your own advice or ask any questions. I'd love to hear from you!
Friday, October 23, 2009
How to Find Out When Etsy Treasuries Open
There are a lot of great features on Etsy. One of which is the Treasury, which is a collection of 12 items that anyone with an Etsy account can pick, and if you're lucky enough to time it when the Treasury opens to new items, you can have posted.
Trying to time it correctly is problematic. Just lurking on the Treasuries, waiting for the number of current Treasuries to drop below the magic number of 222 for the Treasury West, and 333 for the main Treasury, at which they open, is time consuming and nerve wracking. There's a better way, which I'll now divulge. (-:
Just go to http://www.craftopolis.com and click on "Treasury Clock". It will tell you how long before the Treasuries open. One work of warning. I spent a pretty boring and annoying time when the Treasury West was supposed to be opening any minute, because it was at 222 Treasuries. But since the next Treasury to expire wasn't going to do so for 4 more hours, I had a long wait. So open 2 pages on the Treasuries, and use one to click on the link "expiration" on the upper right of the Treasury page. Then click on the last page to find out when the next Treasury will expire. It could be hours away.
Once you've determined a Treasury will soon be opening, leave the page up on the Treasury you're waiting for, and don't refresh the page. Things will happen very quickly once the Treasuries do open. The page will update itself, so just sit tight. Of course, sometimes things don't work out, and for some unexplained reason even though you're diligently watching, the Treasury opens and closes and you don't get a chance to act. That's part of the game, and one must soldier on!
Why the interest in Treasuries? They're fun to make, you get a chance to help promote other Etsians, find out about some of the lovely things for sale on Etsy, and hopefully generate a little buzz about your own shop, too. And a major plus is that if you're very lucky, your Treasury could make it to the Etsy Front Page.
It's a nice courtesy to send a convo to the people you put in your Treasury. You can list one of your own items, and 11 other shops items, plus 4 alternates, which won't appear on the Treasury, unless something sells, then one by one they'll move over to fill in the blanks. Not everyone does send a convo, though, so there is another way to find out if you're in a Treasury.
Go to http://www.craftopolis.com and click on "Treasury Hunt". Then enter your shop name in the field provided, and you'll find out if you're currently in a Treasury.
If you haven't made a Treasury yet, I hope you'll give it a try! I'll be posting next about how to make a Treasury. Thanks so much for stopping by!
Thursday, October 15, 2009
Art and Gift Show
I've just been accepted for my first Show, and I'm really excited about it. My parish is having an Art and Gift Show for Christmas shopping. We're a pretty big parish, around 4,000 families, so there should be a lot of people there.
It will be at Holy Cross Catholic Church in Batavia, Illinois. If you live in the area and are interested in selling there, you should contact the parish office, just google to find out the phone number, or send me a message. It's very reasonable to sell, they provide you with an 8 foot table, or two tables if you need them, it's indoors, in the Church hall, and only 25$ for the table, plus 20% of your profits after you subtract your overhead. It's going to be the weekend of Nov. 13 and 14.
If you'll be in the area, please stop by and say hello, I'd love to meet you! I will only be there on Sunday, between 8 a.m. and 2 p.m.
I'll have all my jewelry from Dalkullan Jewelry, plus I'm crafting a lot of new earrings just for the Show. I've never had to set up a display before, and would appreciate any ideas from you about cheap yet beautiful displays.
Thanks so much!
Saturday, October 10, 2009
Lord Of The Rings
Dalkullan Jewelry has expanded it's jewelry line, with lovely new rings, so perfect for stacking! With genuine gemstones, hand faceted (not by me), aren't they sweet?
Of course, the rings are completely hand fabricated by me. I started with sterling silver stock, and lovingly crafted each ring. I'll make yours for you, to whatever size you desire, and in your choice of the following gemstones: White Topaz, Sky Blue Topaz, Peridot, or Almandine Garnet, which is pictured above. Just specify which gemstone and which size ring you prefer in the customer comments section when ordering.
I hand set the gemstones in a sterling tube setting, and the bands are hammer textured. The two rings pictured are in size 7, and I made them for myself. The ring in front is the White Topaz, and in back is another view of the Almandine Garnet ring.
As always, each ring comes gift boxed and wrapped in lovely Swedish paper, making it perfect for gift giving. With Christmas coming soon, why not order your rings today?
Friday, October 9, 2009
Celtic Earrings -- Mixed Metal
The new creation on the Dalkullan block, Celtic Earrings, are completely hand fabricated. I used my trusty shears to rough out the brass triangle shapes, and then trued up the edges starting with a coarse file, then finer files, and finally with sand paper.
The next step was doming the metal with a wooden punch and dap set. I didn't want to use my metal daps, because I only wanted a slight doming. My wooden dap set is made for watchmakers to smooth out the dents in watch backs, and has a gentle curve, Having a bit of a curve in the metal gives the earrings a
pretty look, don't you think?
Next I moved on to making the center motif, which I constructed from 20 gauge sterling wire, carefully coiling up 3 swirls for each earring. I soldered them together to form the motif, then hammered them on my bench block, and finally dapped them in the same dap I used on the brass triangles, so that the two curves would match exactly.
A final soldering mated the sterling motif to the brass triangles. I used a hand drill to pierce the holes for the earwires, which I'd made earlier, and then popped the earrings into my well loved tumbler for a few hours of polishing.
I'm planning on doing more Celtic designs, they're certainly classic, and I like the flowing lines and beauty of them. Hope you do to!
Friday, October 2, 2009
Sterling Buds -- Earrings
The newest creation, Sterling Buds, is up at my Etsy shop. I took the photos of them using my new lightbox, which I made myself from directions I found online. It's turning out to be very useful, because today is cloudy and rainy, without the lightbox I'd have been stuck as far as photography goes.
I've been learning how to set stones, so far I've done bezel setting, which involved carefully pushing around the rim of the metal cup the cabochon is nestled in, to rub over the metal and hold the stone in. It's definitely harder than it looks to do, and takes a surprising amount of force. That's how the lapis cabochons in Sterling Buds were set.
Yesterday a box of supplies from Rio Grande, a wonderful source of jewelry making things, arrived. I'm excited about it, but also have a certain amount of trepidation, because I'm going to branch out into a new method of stone setting, tube setting. It involved drilling out the end of a tiny piece of sterling tubing, just the right size for the gemstone to sit down into the hole, and then rubbing the rim down over the edge of the stone. I'm going to be working with 3mm faceted gemstones, which are pretty tiny, so please wish me luck, and steady hands! I'll keep you posted how things are going.
Monday, September 28, 2009
Twitter Buttons and A Tale of Two Treasuries
My jewelry has been selected for 2 lovely Treasuries on Etsy!
In The Forest
Dare To Dream
They're both gorgeous Treasuries, with beautiful finds. Drop by and take a look, and don't forget to comment and give them 12 clicks please. (-:
You might be in a Treasury right now, and not know it! To find out, go to Craftopolis and click on the link "Treasury Hunt". To find out when the next Treasury will open up, click on the link "Treasury Clock". "Gift Guide Search" will tell you if you're currently listed in any of the gift guides. Hope you'll find out some unexpected good news!
If you'd like to setup a link on your blog to get new Twitter followers, here's a great place to get free Twitter buttons. It's where I got the Twitter button on the right hand margin of my blog, and they've got tons more styles of cute little birdies.
Saturday, September 26, 2009
Etsy Treasury!
I am the curator of a Treasury at Etsy, entitled "Shadow and Light" that will available for the next 2 days. There's a lot of interesting and beautiful items in the Treasury, lovely embroidery, wonderful photography, and darling acorns crafted from felt. So many gorgeous picks, give yourself a treat and stop in and enjoy some delicious eye candy!
The color scheme is shades of grey, very atmospheric and mysterious. Hope you'll drop by, and please leave a comment if you like what you see.
http://www.etsy.com/treasury_list.php?room_id=84252
Thank you!
The color scheme is shades of grey, very atmospheric and mysterious. Hope you'll drop by, and please leave a comment if you like what you see.
http://www.etsy.com/treasury_list.php?room_id=84252
Thank you!
Friday, September 25, 2009
Wrapped Sterling Earrings
Before I learned how to solder, I thought up a way to make post earrings using wire wrapping. I took a length of square sterling wire, and carefully bent it in half, so that the wire didn't have any twists in it, but lay nice and flat. It surprising how easy it is to introduce an accidental twist in square wire, it's definitely got a mind of its own.
I laid a length of round sterling wire in the center, between the two lengths of square wire, and left an inch or so of the round wire sticking out of the end -- this will form the post. The first pair of earrings I made I didn't leave enough wire sticking out, so that's something you need to be aware of. You can always cut off the excess, adding on is another matter.
To make things easier to handle, I first added some wraps using copper wire, adjusting the sterling wires and lining up everything carefully. These earrings are dainty little things, so this part takes a lot of manual dexterity, and keen close vision. I use a jeweler's magnifier, it's sort of a combo between clunky glasses with changeable lenses and a visor, and I can adjust the magnification up to 10 power.
Once I get everything arranged to my satisfaction, I start replacing the temporary copper wraps with half-round sterling wire wraps. Then comes my favorite part, forming the wire wrapped bundle into a hoop. I do this by bending it around a piece of dowel. Some filing, sanding, a final polish in a tumbler, the addition of sterling earnuts, and they're done.
If you'd like to own your own pair of Wrapped Sterling Earrings just drop by my Etsy shop, Dalkullan Jewelry.
Tuesday, September 22, 2009
Moon and Stars -- Sterling and Pearls
Moon & Stars, in sterling with pearl dangles, is a completely hand fabricated design. I begin with a sheet of sterling, and punch out two disks. The next step is trickier, taking out the central disk, to leave the hole in the first disk.
I have a heavy sheet of plastic, with holes of various diameters cut out in it, and line up the correct size hole over a sterling disk, until I have it just right, then mark the location with a Sharpie. I use that mark to line up the disk in the cutter, then punch out the hole. I could also use a jeweler's saw to make the disks, but I prefer to use a disk cutter -- it makes perfectly round disks every time.
The next step is to metal pieces of sterling scrap for the round sterling balls. I put the scrap on a charcoal block, and melt the silver with a torch. It's a lot of fun, the metal gets shiny, and then begins to curl up on itself, until it forms a nice round ball with a flat bottom. If I want to make a completely round sphere of sterling, I'd just scoop out a little hemisphere in the charcoal block to place the scrap sterling in before melting.
I do the finishing of the disk before I solder the sterling balls on. It's much easier to file, sand, and texture the disks beforehand, which is something I've learned from experience. I used a coarse file to create the texture on the disks, suggesting the surface of a moon after oblique meteor impact.
After sweat soldering on the sterling balls with medium solder, I attach the two jump rings using easy solder. Since the medium solder needs a higher temperature to melt than easy solder, the sterling balls stay securely soldered.
The final steps are attaching the freshwater pearl dangles using wire wrapping -- pearls are too delicate to take the heat of soldering, and adding handcrafted sterling earwires. And voila! A new earring design is complete, ready to be photographed and listed at Dalkullan Jewelry.
Thursday, September 17, 2009
I Made The Etsy Front Page!!!!
I've been on Etsy since April 6, 2009, and in that time I've admired the lovely items on the most highly coveted piece of real estate on Etsy -- the Front Page.
I'd hoped to get there someday, but had my doubts, there's just so many very talented crafters on Etsy, and such lovely items.
Imagine my surprise and joy when I checked my Google Analytics numbers and saw that traffic to my shop had gone through the roof. With shaking hands and a pounding heart I clicked on the link to craftcult.com, which is a great site, and let's you know if you've been on the Front Page, Storque, or any of the gift guides. And wow! I had made the Front Page!!!!!!!!
This came at just the right time, because I'd been feeling at a low ebb, no sales this month and my last few photo shoots hadn't yielded any good pics. What a truly wonderful affirmation from the good people at Etsy. Thank you so much!
The earrings sold, and then they dropped off the Front Page, so I didn't get to actually see them there, that would have been very exciting. I wish that when an item sold they didn't lose all their hearts, because then all the people that were thinking about buying them might not be able to find the earrings again.
I photographed the Hammered Brass Earrings dangling from an amazing pottery piece that belonged to my dear Aunt, the lady that ran the original Dalkullan store that my shop is named in honor of. She kept that pottery piece on her desk always, and now it's been on the Front Page of Etsy!
I'm such a big silly, I didn't realise that my earrings were picked for the Front Page because they were part of an amazing Treasury curated by Octavia of DreambyDay, an wonderful shop at Etsy!
This sculpture, House Where Nobody Lives
is an original work created by Octavia. Please stop by her Etsy shop filled with lovely things, and take a look, then stay to buy! This is from the DreambyDay
shop announcement:
"A boutique full of wonderfully nostalgic pictures, original art, ephemera, and sundries that celebrate the art of daydreams and yesterdays."
Come and visit, it's a treat!
You can also find DreambyDay on Facebook
and read her great blog too!
Thanks so much for stopping by and taking the time to read this.
Thursday, September 3, 2009
Aspen -- Mixed Metal Earrings
The idea for the Aspen earrings came to me when I was waiting out in the car for my husband to finish his appointment at the dentist. I had brought a sketch pad, and was doing some drawings, when I noticed a tree that had interesting leaves. A couple sketches latter and I had my new earring design. I must say, that was the nicest dental appointment I was ever involved in.
To make the earrings, I cut out the rectangular shapes from a sheet of copper. I made two drawings of the design on paper, cut them out, and using rubber cement affixed them to the copper. For each leaf and the twig, I took a center punch to make a little divot in the metal, then drilled a tiny hole with my trusty Dremel.
The next step is to take one end of the blade off the jeweler's saw, thread it through one of the little holes, re-attach it to the saw, and carefully saw out the shape, following the lines on the drawing. The blade has to be removed from one end of the saw, taken out of the hole, and then threaded through the next one, and so on, for each one of the holes.
The next step is smoothing with needle files, to make each leaf as pretty as possible, and all-over sanding to take any burrs off the edges and remove all scratches off the front and back. Then the earrings had a few hours of mixing it up with steel shot in a tumbler. And out they came, all shiny and pretty!
I made some sterling earwires, balling up one end of a wire with my torch first, then cleaned up the wires, shaped them, and put them through the tumbler too, until they were polished and work-hardened. You don't want your earwires to be easily bent, but to stay nicely in shape.
Here's a photo of the Aspen earrings posing on the rim of a glass. I think they turned out really cute, hope you do too!
If you'd like to see more pictures of them, or of my other creations, please stop by my online shop, Dalkullan Jewelry.
Friday, August 28, 2009
craftyGAgal
Meredith Crosby -- craftyGAgal is a wonderful, kind, friendly, and amazingly talented person. Here's a little more about Meredith, from her etsy profile:
I am a Mom to twins boys who amaze me more each day (and at 7 yrs old that is a lot of amazing days), wife to my best friend, etsy lover, a yarn junkie, a beadaholic, a coffee addict, and ALL Round Good Southern Gal who happens to have a bad case of Crafter's ADD! I suffer from chronic pain due to a failed spinal fusion and hurt every minute from the second I open my eyes BUT everything happens for a reason......and now I am here! I craft to keep busy am hoping that it will turn out to at least fund my crafting habit. Wanna know anything, and I mean anything, else- just ask. I am "convo" friendly and love to chat chat chat.
The following are questions that Meredith asks people she profiles on her blog, and she was gracious enough to let me use them, and to answer them for me.
1. What kind of handmade items do you sell in your etsy shop?
Handmade Stained Glass Jewelry, beaded and gemstone jewelry, and coming soon- crocheted items. I also have another etsy shop with a partner http://dylanblue.etsy.com
2. Explain your craft/art for people who may not be familiar with it?
Stained Glass Jewelry is a multi-step process. I do the complete stained glass process myself. I cut, grind, wrap in copper foil, apply flux, solder, clean and finally polish EACH hand chosen pieces of glass. I use the copper foil method and always use LEAD FREE Solder.
4. If you have to pick one item in your shop as your Favorite which one would it be?
My favorite, like everyone else,if I HAD TO PICK, would be http://www.etsy.com/view_listing.php?listing_id=27357768 WINDOW TO THE SOUL Amethyst Gemstone Necklace with Handmade Stained Glass Purple Pendant because it is the first time I've mixed mediums, both stained glass and gemstones.
So please visit Meredith's etsy shop, follow her on twitter, become her Facebook fan, and visit her blog. She's a great person to know, a truly caring and kind person, with a wonderful talent.
I am a Mom to twins boys who amaze me more each day (and at 7 yrs old that is a lot of amazing days), wife to my best friend, etsy lover, a yarn junkie, a beadaholic, a coffee addict, and ALL Round Good Southern Gal who happens to have a bad case of Crafter's ADD! I suffer from chronic pain due to a failed spinal fusion and hurt every minute from the second I open my eyes BUT everything happens for a reason......and now I am here! I craft to keep busy am hoping that it will turn out to at least fund my crafting habit. Wanna know anything, and I mean anything, else- just ask. I am "convo" friendly and love to chat chat chat.
The following are questions that Meredith asks people she profiles on her blog, and she was gracious enough to let me use them, and to answer them for me.
1. What kind of handmade items do you sell in your etsy shop?
Handmade Stained Glass Jewelry, beaded and gemstone jewelry, and coming soon- crocheted items. I also have another etsy shop with a partner http://dylanblue.etsy.com
2. Explain your craft/art for people who may not be familiar with it?
Beaded and Gemstone jewelry is a little more simple..I try to let the beads/gems speak to me, and I try to listen.
3. What is your favorite part of the creative process?
My favorite part is when I am all finished and I can see the effort of my hard work. I also like Shopping for supplies & stash.3. What is your favorite part of the creative process?
4. If you have to pick one item in your shop as your Favorite which one would it be?
WINDOW TO THE SOUL Amethyst Gemstone Necklace with Handmade Stained Glass Purple Pendant because it is the first time I've mixed mediums, both stained glass and gemstones.
5. Where do you hope to see your etsy shop in 1 yr?
I would love to be making money.... to make a living doing what I love. Simple!6. Is etsy the only place people can find you online?
For right now etsy is the only place that I have stuff for sale (besides my other etsy shop I mentioned above). I also love blogging- http://southernhandmadegifts.com , love being a social media butterfly- love Facebook, Twitter, and about 50 more I am members of.So please visit Meredith's etsy shop, follow her on twitter, become her Facebook fan, and visit her blog. She's a great person to know, a truly caring and kind person, with a wonderful talent.
Tuesday, August 4, 2009
Etsy Gift Guide
A pair of my wire wrapped sterling earrings were picked for an August Etsy Gift Guide -- Shades of Peridot. Peridot is the birthstone for August, and my Silver Cherry Tree leaves come already wrapped in beautiful Swedish paper. If you know any ladies with an August birthday, they'd make the perfect gift!
I crafted the Silver Cherry Tree Leaves earrings from sterling silver, and embellished them with genuine semi-precious Peridot and the soft gleam of freshwater pearls.
Please drop by my Etsy shop, Dalkullan Jewelry, to see more pictures of these gorgeous earrings, and also my complete line of handcrafted, original designs.
Thursday, July 30, 2009
Moon and Stars -- Mixed Metal Earrings
Just listed these at Dalkullan Jewelry.
The lovely color variations on the brass disk are the result of heating the brass.
I made the shiny balls by melting sterling with my trusty torch, and then soldered them onto the disks.
I've been thinking about this design for months, but needed to get the right tools, and hone my torch skills, so that I could make them. Thanks for dropping in and taking a look!
Wednesday, July 29, 2009
Runway Crochet
I'd like to introduce you to a wonderful person, who also is a talented crochet artist, Runway Crochet. You can visit her at Twitter , become her Fan at Facebook,
or follow her blog.
Runway Crochet's fine merchandise is available for purchase at her shop at Etsy.
She makes the most amazing crochet clothing, jewelry, and accessories, and also has a lovely stock of vintage, including dolls in native costumes.
I recently had the good fortune to win Runway Crochet's contest she was running on her blog, and was awarded 10 pairs of the cutest baby shoes imaginable. Actually, they're cuter than my imagination could conjure up!
Aren't they adorable? All the different styles, so beautifully made, and they arrived so carefully packaged.
These little baby sandals are so sweet, with their little ribbon ankle straps!
I'm sending them to my son and daughter-in-law for their new baby, who is do to make his (or her) appearance in the world at the end of August. He certainly won't lack for beautiful little shoes!
I bet you're dying to see some of Runway Crochet's awesome creations for adults, so here's a little sample of her artistry.
Isn't it gorgeous? It's Runway's Circle Shrug, and think of all the lovely combo's you could create with it. Perfect with your little black dress, also to keep you cozy over a summer dress in those air conditioned restaurants, and obviously it looks stunning with just jeans and a t shirt.
Here's a little about Runway herself, from her Etsy profile:
"
What kid didn't toy with the idea of fashion design using paper dolls by tracing them and creating fashions out of different papers, crayons, markers, pencils and a pair of scissors? I sure did but, when it came to going off to college, fashion was not one of the subjects I studied. As the matter of fact, my high school sweetheart accused me of not being "in style" at the time. I guess some men do pay attention to those sort of things more than you'd think.
It wasn't until a few years after I graduated that I actually started to teach myself how to crochet along with learning a few other crafts and needle arts. A gift from my father, Reader's Digest Guide to Needlework was the book that started it all! Besides that, there are so many wonderful books from published crochet designers out there with so many gorgeous things to drool over – I can't imagine not wanting to crochet some of them, and create a few original designs of my own. Otherwise, I'd be bored stupid!"
Hope you'll visit Runway Crochet and check out her wonderful shop!
Tuesday, July 28, 2009
Sterling Disk Earrings
These earrings were fun to make, with the added plus that I learned a lot. They're the first pair of post earrings I've made, and soldering on the wire took a bit of doing.
But, first things first. I started by using my trusty disk cutter to punch out .5 inch circles from sterling stock, and then textured the disks with the sharper end of a riveting hammer. My sweet hubby was kind enough to file and smooth the rivet hammer so it makes a nice impression on the metal. And first impressions are so important, don't you think?
I marked the center and drilled a hole part way through the back, to provide a little pocket for the tip of the earwire to fit. This makes a stronger join than just soldering the wire tip to a flat metal surface. I fired up my little torch, and soldered on the earwires to the disks, and also melted a couple pieces of sterling into nice round balls.
Alas, the little round balls didn't stay round for long! I put them on my bench block and pounded and textured them, too. Then they were sweat soldered (that sounds a bit disgusting, but it's just melting the solder on the back of one piece, laying it solder-side down on another, and then heating it to soldering the two together) and I followed up with a bit of filing and sanding.
Then a few hours jostling in the tumbler, and they were ready for their photo shoot. Hope you enjoyed reading about how the Sterling Disk Earrings were made, and thank so much for stopping by!
Friday, July 24, 2009
Hammered Brass Earrings
Here is the finished project. I decided against adding the bronze dyed freshwater pearls, I think just the two metals look so lovely, and the simple elegance of the design doesn't need any more adornment.
I textured the brass part of the earrings with a ball pein hammer, and then annealed the metal. Annealing is heating with a torch until the crystalline structure of the metal becomes malleable again. When metal is worked, it becomes harder and brittle, but annealing it makes it easy to bend again. Then I did a final dapping, to shape the earrings. With the addition of handcrafted sterling earwires the earrings were finished.
The background in the photo is a pottery piece I inherited from my Aunt, the same Aunt from Dalarne in Sweden that Dalkullan Jewelry is named for. My Aunt owned an inport shop in Chicago called Dalkullan, which means 'girl from Dalarne' which she was, and I chose the name to honor her memory, and my Father's, who was also from Dalarne.
Tuesday, July 21, 2009
Fabricating Metal Earrings
I'm working on a new earring design, and it's one that I'm fabricating from sheet metal and wire.
The picture to the right is a piece of brass sheet metal, and you can see the holes where I've punched disks out. Using a disk cutter, I slide the sheet metal into it, strike a couple blows with a household hammer on the cutter, and out pops a lovely round metal disk. It's a lot easier and more accurate than the way I used to make circular metal disks, using a jeweler's saw.
Next I cut an addition hole out of the first disk, this one off-center. Then I hammer the metal with the ball end of a ball pein jeweler's hammer, to texture the metal. And finally I give the metal a rounded form, using a dapping block and punches.
A dapping block is a heavy piece of steel with hemispherical depressions tooled into it, and the corresponding punches are bars of metal with spherical steel ends that mate up with the holes in the dap. Using a dap makes it possible to evenly round a piece of metal.
The earring still needs to be filed and polished, and have an earwire attached.
I'm going to use a sterling earwire, and maybe a bronze colored freshwater pearl. As you can see, it's a work in progress, but I hope you've enjoyed getting a little glimpse into how I make jewelry.
Thanks so much for stopping by!
Tuesday, July 14, 2009
Lifesaver Earrings, Part Two
All the different colors of the Lifesaver Earrings are up at my Etsy shop now.
The final two colors are Sea Mist Green and Sky Blue.
It's definitely a challenge to solder close to glass beads. Too much heat too fast and the once lovely bead is a pile of glass fragments. I also learned that quenching the earring instead of letting it air cool can result in fractured beads. It's fun to rise to the challenge, though, and I've learned a lot about soldering near delicate beads in the process.
If you'd like to own a pair of the sweet and colorful Lifesaver Earrings, just drop by my Etsy shop. Or you might be able to win a pair for yourself, and also for a friend. Visit my Facebook business page to find out how.
Saturday, July 4, 2009
Hawks Nesting In The Front Yard
For the past month or so we've had a family of hawks nesting in a tree in our front yard. We saw them scouting out the area last year, and they began building a nest, but deserted it after a few days, dashing our hopes of seeing them raise a family. This spring they returned, enlarged their nest, and started their brood.
There are five babies in the nest, and they've been growing at an incredible rate. This picture was taken just a couple weeks ago, and now the little hawks are a lot bigger.
Both parents were taking care of the young ones at first, but lately I've only noticed the mother feeding the babies.
They were just puffs of light tan fluff at first. Sorry this picture isn't clearer, but I took it through a window using the zoom feature. The nest is a collection of twigs, and doesn't look very sturdy, in fact, there's been a steady decrease in the size of the nest as twigs are knocked off during storms, but amazingly it's held together.
We had a terrible thunderstorm, very windy and rainy, and I watched helplessly as the mother hawk defended her babies from the elements, shielding them with her wings. Every time thunder would boom, I could see her tremble. Thank goodness they all came through that storm in good condition, and the nest held together.
It's a treat to watch the little hawks growing, we can see them from our bedroom window
and also from the front yard.An added bonus is I've noticed a decrease in the chipmunk population, which were really becoming a terrible bother. Chipmunks are cute, but they can be destructive, especially when they start tunneling under your sidewalks and patio.
We aren't sure what type of hawk they are. My husband has narrowed it down to two, Sharp Shinned Hawk or Cooper's Hawk. They have a call that sounds like the jungle bird noises from the old Tarzan movies, at first I thought it was a person making the noise, not at all what I thought a hawk would sound like.
This is the size the little hawks are now, about half the size of their mother. They've got some real feathers, but they still have a lot of their baby fuzz. They like to flap their wings and hop about in the nest, and the mother leaves them alone for increasingly longer periods.
I'm looking forward to seeing them learn how to fly. Judging by how fast they're growing and how many feathers they've got, I would imagine they'll be flying in the next couple weeks. The hawks are a noble and majestic bird, and it's been a real pleasure to have them nesting in our tree. I hope they come back next year.
Thursday, June 25, 2009
Flamework Beads
I bought the lovely flameworked beads that I use in the Lifesaver Earrings line at the recent Bead & Button Show in Milwaukee from Isis Beads. Isis Ray, owner of Isis Beads, was at the Show selling her handcrafted beads in person, and she had an amazing array of beautiful wares on hand. Deciding on which ones to buy, when they were all so tempting, was far from easy.
I also bought some other beads from Isis Ray, and will be making earrings and also a bracelet from them in the coming weeks.
Here is a great explanation of how flameworked beads are made, written by Isis Ray:
"Flame-worked beads are made by melting glass canes in the flame of a torch and winding the liquid glass around a steel rod, which has a clay based releasing agent on it to keep the glass from bonding to the steel. The rod must be evenly rotated to center the hot glass, and the correct temperature of the bead must be kept even without losing the desired shape, all with a light touch so that the thin clay coating doesn't break. The finished beads are held at 950 degrees F in a kiln to anneal, or align the glass molecules. They are allowed to cool very slowly before being removed from the steel rod, which forms the hole of the bead.
Each bead is a bit of magic, made with glass and fire, hands and eyes, but coming from the heart. I draw on a background in Fiber Art to make beads with a balance of color & light, design, pattern and proportion. "
-- Isis Ray
You can reach Isis on the internet at http://www.IsisRay.com and by email at
isisbeads@centurytel.net
After the beads used in the Lifesaver Earrings were formed, Isis added an additional step, of etching them in an acid solution, which gives them a matt finish, very much like sea glass.
Wednesday, June 24, 2009
Sailing 101
I spent Monday and Tuesday taking a sailing class with my husband. We sailed out of Burnham Harbor in Chicago aboard a 33 foot Hunter sailboat, the KnotACare.
We had to run the inboard motor to get out of the harbor, but once out on Lake Michigan we turned off the engine and got underway using sail power.
This is a view looking over the bow of the boat. That black triangle in the left corner is part of the entryway to go below decks.
The boat had two cabins, a galley (kitchen) and a head (bathroom). It also had air conditioning, which to my dismay I found out wouldn't work once we left the dock, since it operates off of ac supplied by a plug in to the electrical supply on the dock.
But once we got underway, we left the 100 degree heat of Chicago behind, for the pleasantly cool breezes on the lake, and the A/C wasn't needed anyway.
The round metal object (winch) in the foreground with the sheets (ropes) tied around it is used to position the sails, which is called 'trimming' the sails. There are a lot -- a whole lot -- of terms associated with sailing, it's almost like learning a foreign language, and I've got a long way to go yet.
I was a bit apprehensive about getting seasick. I went whale watching once off the coast of Cape Cod and spent most of the time deathly ill.
But the fates smiled on me during the sail, and I felt fine.
The boat in this picture is the Sea Witch and she has a lot more sails than The KnotACare. The KnotACare had two, the mainsail, which provides most of the propulsion, and a jib, which helps out on propelling the boat, and which also is adjusted when the boat is moved in different positions relative to the wind direction.
The mainsail is also adjusted, or 'trimmed' during the sail. This is done manually, by pulling on the ropes attached to the sails. After awhile, this gets a bit hard on your hands, not to mention your back and arms. I was surprised just how strenuous sailing is, and gained a whole new respect for the men who used to sail the tall ships during the days of shipping by schooner.
One surprise to me was the presence of flies out on the lake. At the harbor there were hardly any, but once off shore, they were a constant and annoying companion. Why they're out there I haven't a clue. The second day of the sailing lessons we brought bug spray, and solved the problem of the biting black flies.
It's so beautiful out on the lake. This is the view looking back to Chicago, that thin hazy layer was really there, it's not an artifact of photography.
The water was that lovely blue, and the sun sparkled off the surface.
There was Captain Jim, our instructor, my husband and myself, and another student on the sail. We learned to trim the sails, steer the boat, and how to care for the boat and what the rules of the road (they call them that, even though you're on the water) and some of the laws concerning boating. And also practiced rescuing a man overboard, which thankfully was just a seat cushion overboard.
At the end was the much dreaded test, which we had to pass to get our certification. We each had to go through various maneuver's with the boat, taking turns skippering and also trimming the sails, demonstrate some different knots, and then take a 100 question written test. I'm happy to report that all three of us passed!
I'm looking forward to going sailing again. We've got one more sail with an instructor, to learn to dock the boat on our own, and demonstrate one more time our newfound sailing skills, and then we'll be able to sail alone. It's going to be a lot of fun to go sailing with just my husband, enjoying the serenity of Lake Michigan.
Tuesday, June 16, 2009
Fabulous Beaded Creations
On display at the Bead & Button Show at Milwaukee were prize winning pieces in various categories. In the flameworked beads, this necklace was an hard to miss, it looked delicious, in fact!
By Debra Kallen, of Langley, British Columbia, Canada, and titled Xmas Garland.
It looks like strands of candy and popcorn, but it's all handmade beads.
Who wouldn't like to find that in their stocking on Christmas morning?
This necklace is composed of flameworked beads, with many different shapes and colors, just a lovely work. Unfortunately I don't know who the artist is, but it was a prize winner , and just stunning.
This miniature Bakery is so adorable! I just love miniatures, and this little shop looks like you could just walk right in and enjoy the beautiful food, doesn't it? Sadly I don't know the name of the talented artist who created this lovely Bakery, all from flameworked beads.
The tiny tea service, and all the beautifully detailed food is amazing. What little girl (or big one!) wouldn't love to own this darling shop.
I know I would.
I was completely bedazzled by the incredible skill of the ladies from Japan, who's legendary beadwork must be seen to truly appreciate it's beauty. My photos certainly don't do them justice, and after seeing them in person, I don't think it's possible to capture their delicate beauty photographically, because they're more remarkable than even professional photography shows.
The red beadwork is a covered box, as large as an ottoman, and all worked in the tiniest of seedbeads. The hours and hours of meticulous work it took to create this stunning work are numerous, I'm sure.
Sunday, June 14, 2009
Lifesaver Earrings
I'm working on a new line of earrings, which will be called Lifesaver Earrings. They'll be in lovely pastel colors, with hand soldered wires, using the skills I picked up in my recent soldering course.
I bought the beads at the Bead & Button show, they look a bit like lifesavers candy, and have a frosted appearance like beach glass. I'm really excited about the new earring line, and hope you'll like them too!
The earrings will be in my etsy shop this week, and I'll put some photos up here, too!
I bought the beads at the Bead & Button show, they look a bit like lifesavers candy, and have a frosted appearance like beach glass. I'm really excited about the new earring line, and hope you'll like them too!
The earrings will be in my etsy shop this week, and I'll put some photos up here, too!
Wednesday, June 10, 2009
Dalkullan Jewelry Wins A Blog Award
Thank you very much Glenna from Your Fabric Place blog for giving me the One Lovely Place blog award! I'm really happy that you thought enough of my blog to do this, thank you!
Here are the One Lovely Place blog award rules:
1. Accept the award, post it on your blog together with the name of the person who has granted the award, and his or her blog link.
2. Pass the award to 15 other blogs that you’ve newly discovered.
3. Remember to contact the bloggers to let them know they have been chosen for this award.
These are the 15 wonderful blogs I've selected, in no special order of preference:
1.) SleepDreamPlay
2.) NomadCraftsEtc
3.) TeddyStartedIt
4.) ThePaperButton
5.) AllThingsTangled
6.) CabinandCub
7.) AudreysCountryCrafts
8.) TethyisDreams
9.) HighHopesStamps
10.) SumpinElseCustomGifts
11.) LittleDickensDesigns
12.) EviesToolEmporium
13.) JulieAnnArt
14.) Trudette
15.) Angela-SummerTravels
Tuesday, June 9, 2009
Soldering Class
Last week at the Milwaukee Bead & Button Show I took a class in soldering. I've done some soldering before, I've made a couple pairs of earrings for myself and one of my daughters, but wanted to improve my technique. And this was definitely the class to do just that.
The class was taught by Mr. Joe Silvera, you can reach him online. He crafts amazing jewelry, and also teaches jewelry making classes. Joe is very patient, encouraging, and explains things clearly. He provided a lot of demonstrations in different aspects of soldering, which I really enjoyed. It's always fun and relaxing to watch someone else work, and to learn something too is a definite plus.
We melted sterling wire to form little balls of silver, learned to solder jump rings closed, and to solder jump rings together. In class we completed a pair of soldered sterling earrings, with a hammered and soldered motif at the bottom. Unfortunately I was a couple hours late to class, but I did manage to finish the project during class time. Overall I'm pleased with the outcome, I met my objective in learning more about soldering, and saw some wonderful demonstrations. The hammered motif on the bottom of the earrings has some symmetry issues, but the soldered joints look really good, and they're strong, which is what I was focusing on. With more practice I feel confident that I'll soon be incorporating soldering into my designs for my shop, and that's exciting! There are so many ideas I have which I really need to solder to execute. Jewelry crafting is a creative adventure, one that I'm enjoying immensely.
The earrings were a lot of fun to make,and I'm looking forward to crafting my own designs, and perfecting my soldering technique.
Sunday, June 7, 2009
MZ Glass
There were so many venders with so many beautiful beads at the Milwaukee Bead & Button Show, it was pretty overwhelming. Very exciting to be there, and just drink it all in. I walked around for a couple hours, seeing what was available, and enjoying being in the same room with hundreds of people who all shared the same interest -- beads and jewelry. The picture on the right shows only a fraction of the vendors at the show.
My strategy was to only buy beads that I had a definite plan for, and not succomb to the temptation I'm sure everyone who's ever shopped for beads has experienced -- the urge to buy beads because of their beauty, and hope to devise a design for them later on. I've heard it referred to as 'releasing your inner magpie', something I've done on more than one occasion.
After my first circuit of the marketplace, I got down to business. Beautiful, handcrafted beads, made by the vendor herself, was my quest. And I found just that in MZ Glass, Margaret Zinser's amazing flamework beads.
Margaret is a wonderful person, warm and friendly, and it was a pleasure to meet her and to chat. You can reach Margaret through her website
and view and order online her gorgeous flamework beads.
Her work is also featured on the cover of "The Flow" magazine. I bought some lovely beads, just what I was hoping to find, which I'm going to make into earrings, and will have listed in my Etsy shop in the coming weeks.
Friday, June 5, 2009
The Show Floor
I'm heading back to Milwaukee today to attend the Bead & Button Show, this time to buy beads and supplies. I can't wait to see all the beautiful beads and jewelry. If you ever get a chance to go to the Show, don't hesitate, it's really something.
There are cases displaying all the contest winning jewelry pieces, and they are incredible. Photography really doesn't do them justice.
I'll be posting more on the Bead Show, and my class soon. The class was awesome, Mr. Joe Silvera and his assistant were just the kindest, most patient, and incredibly skilled jewelers.
Hope you have a wonderful day today, and thank you for reading my blog!
Heather
Tuesday, June 2, 2009
Making Metal Beads Class
I'm really excited about the class I'm taking tomorrow. It's called "Making Metal Beads" and it's held in Milwaukee at the Bead & Button Show. I'm going to improve my soldering technique, and then I'll be able to incorporate that into my jewelry making.
It's a major step for me, and I'm eager to make progress in crafting jewelry. I've done some work with a torch before, I ball earwires and headpins with my trusty torch, and I've soldered a few pairs of metal earrings for myself and as gifts, but I haven't offered anything soldered for sale yet.
Making my own metal beads will open up a lot of design possibilities. It's going to be fun, wish me luck, please!
I'll be blogging about the class, and hopefully have some pictures to share later this week. Thank you for reading my blog.
Wishing you all the best,
Heather
Monday, May 18, 2009
My First Sale!
This is my first sale, Silver Cherry Tree Leaves Earrings.
It's really wonderful to finally make a sale -- so exciting!
My dear daughter bought them as a gift. She's been my number one fan and supporter -- I really don't think I'd have had the courage to keep going on this enterprise without her encouragement and advice.
It's really wonderful to finally make a sale -- so exciting!
My dear daughter bought them as a gift. She's been my number one fan and supporter -- I really don't think I'd have had the courage to keep going on this enterprise without her encouragement and advice.
Subscribe to:
Posts (Atom)